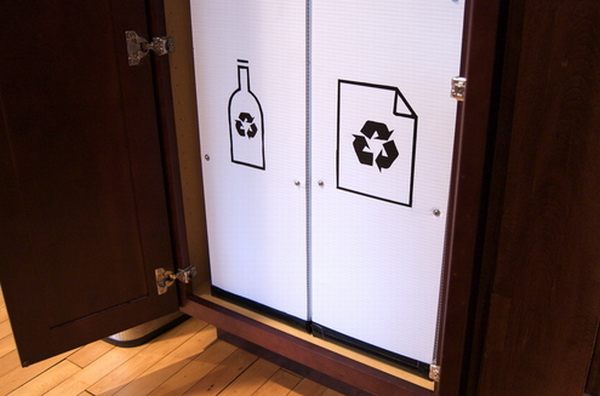
This is the age of recycling and anything and everything can be recycled with a bit of patience and abundant creativity. Recycled products were not so attractive and colorful a few years ago. Now, the market for such products have improved tremendously and we find that recycled products are as beautiful and attractive as the other products and hence entirely acceptable. Coming to the point of helping the recycling industry with our own input, we must ensure that we collect all materials that can be recycled and transfer it to the responsible agencies to be able to run this enterprise well. If you do not have a neat system of collecting bottles and papers that can be recycled, here is a wonderful pantry recycling system that you can make at home and collect materials in a neat and segregated arrangement:
Difficulty Level: Easy
Time required: 2 hours
Resources required
White corrugated paper â 2 (30 x 36 inch)
Corner Brackets (this would help in reinforcing the corners without falling apart)
Silicone Caulk- for sealing the inside areas of the joints.
Duct Tape- for joining the pieces together.
Estimate Cost: About $24
Instructions
1. Take the sheet and divide it into 4 equal sections. The idea here is to reduce the seams so that the box will be very sturdy and have fewer chances of the sides from falling apart.
2. Draw a line through the divided parts. Now you can carefully fold along the lines so that you get 36 inch height for the recycling box and 9 inch width for each section.
3. The size can be adjusted according to the size you require. If you want a bigger box, you can use a bigger sheet for the purpose.
4. From the base of the folded sections, fold a part of the sheet inside form all sides. This will form the sturdy base of the recycling box.
5. The plastic has to be scored in the opposite side of the direction of the fold you have created for the base and also the sides of the box where it is just folded vertically. This means that the scoring has to be done on the outside surface of the box. Use a sharp knife for this purpose so that the cut is straight and fine.
6. Ensure that you use a protective sheet underneath the sheet so that your table is not left with scratch marks from the cutting session.
7. Now you can firmly fold the flaps inside to form a base for your box. Use a duct tape for securing the underside of your box.
8. The corners are not yet sturdy with this and so you can fix the corner brackets inside.
9. Fix the brackets in all four corners. You may fix one set on top and the others somewhere in the middle as well. This will ensure that the box is strong enough to hold all the recycling materials that you throw inside without bursting.
10. Finally use the silicone for sealing the sides from the inside.
11. The box is now ready. All you need to do is to beautify it. You can add the recycling icon to the box and paint the exteriors as well.
12. Use a contract paper and trace the recycling icon on to it. Stick the paper on to the bin and then cut the icon design that you have just drawn with a paper cutter. The holes where the icon is cut will now be painted with the colour if your choice, ideally green or black.
13. Use spray paint for painting the surface in a well ventilated area and after it is dry, which will be a couple of hours, the contract paper can be removed. Use a Q tip for sharpening the smeared sides of the icon. Your box is now ready for use!
Frequently Asked Questions
1. Can the box be done with a lid?
Ans: Yes, you can get a ready made Friction Lid- for creating a tilt out mechanism if you want. But the bin works just fine even without them.
2. Are the corner brackets necessary?
Ans: You can make the box even without the corner brackets. However, the brackets will give them a firm shape even when the bin is overflowing.
Quick Tips
Use a readymade sticker icon or just use a permanent marker for drawing the icons on the box if spray painting is not an option.
Things to watch out for
Make sure that the paint does not smudge or drip when you spray paint the icons.


