
Laptop stands are used to increase the cooling effect of the processor fan located at the bottom of the laptop. Generally, the stands are provided with aerated spaces or d.c. powered fans to cool the motherboard. Though it is a useful thing for safe operation of your laptop for prolonged periods, you will not find any model below $60 in the market. Here is an ergonomically designed model of a laptop stand made out of recycled unused cardboard.
The design is such that the inner space is sufficiently aerated for proper dissipation of the processor heat. Moreover, this design rests the laptop in an inclined position toward the front to enhance proper viewing of the screen and easy operation of the keyboard. You can also opt to make a horizontal design. The following steps describes how to do it.
Difficulty level
Moderately challenging (may require expertise in few areas)
Time required
This project will take a day to get completed. It varies according to the expertise and efficiency of the person involved.
Resources required
- Old unused cardboard boxes made of double layered corrugated paper
- A sharp knife
- A box cutter
- A cutting mat
- A metal ruler or measuring tape (a ruler will help you to draw straight lines for marking)
- A tube of superglue
- A box of dressmaker’s pins
Estimated cost
The estimated cost involved in this project is around $3-$5 (if you need to buy the superglue tube and the pins)
Instructions
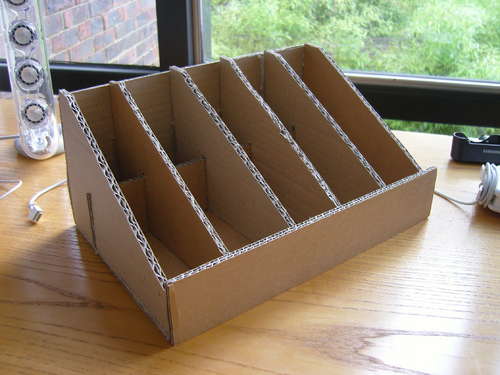
- You need to cut 5 types of shapes from the cardboard box. They are the base, the front support, the middle support, the back and finally the stands. Take proper measurements of the base of your laptop. Accordingly, mark and cut the base with the help of the box cutter and knife.
- Then, decide the height at which you want to place your laptop. Accordingly, measure and cut the back portion.
- Cut the front support in a similar way. Keep it in mind that the height of the front support should be lesser than that of the back portion if you want to keep the laptop in an inclined position. In case you want to place your laptop in the horizontal position, make the front stopper equal in height with the back portion.
- Cut one more piece of cardboard exactly same as that of the front support for the middle support.
- Cutting the stands is the most critical part. Carefully mark and cut them in an inclined way as shown in the picture above, in case of an inclined stand. In the case of a horizontal stand, the stands can be cut out in simple rectangular shapes. If you own a big and heavy laptop, cut more number of stands to withstand the weight. In the middle portion of the stands, cut in a thin slot such that the middle support fits in tightly as shown in the picture.
- Now, let’s start the erection process. First of all, fix the front support and the middle support with the help of superglue and dressmakers pin with the base. Next, mount the stands at equal distances from each another on the middle support (you already have the slots and just need to slide them in and apply superglue). Finally fix the back portion at the end of the stands.
- You can also attach platforms on the lateral sides to place your usb mouse or small speakers to make it more useful and stylish.
- Leave the glue for drying for at least 15 hours.
- Your laptop stand is ready.
Frequently asked questions
Which type of cardboard do I use to make this stand?
You should use the one made of a double layered corrugated paper. The double layered cardboard is sufficiently hard and can withstand sufficient pressure in the vertical position. You will surely find one in any supermarket (especially in the TV showrooms) or any other stationary shop.
Why should I use both pins and glue for joining the cut pieces?
This is very important to maintain proper balance and support when the glue is soft. The pins will hold the cut pieces in place and prevent them from slipping away while the glue cures and dries properly. More over, the pins add extra strength to the joints.
Quick tips
- You can apply any color of your choice on the stand and make it look stylish and sleek.
- Do the measurements precisely and accurately.
- Make sure that the knife you are using to do the cuttings is very sharp to get fine cut edges. This will make the stand look smart.
- You can make small circular holes on the back and front supports in order to allow air circulation for better cooling of your laptop.
Things to watch out for
- Don’t place your laptop on the stand as soon as you finish making it. This will ruin everything as the stand will break down and eventually drop your laptop. Leave the glued joints to cure and dry for at least 15 hours before applying any load on it.
- Make sure that you use cutting mat while cutting to save the surface of your working desk or floor.
- Don’t use a glue meant for sticking envelops and stamps. That will never hold the joints tight enough to hold your laptop’s weight. Instead, use a good superglue which is meant for plywood joining.