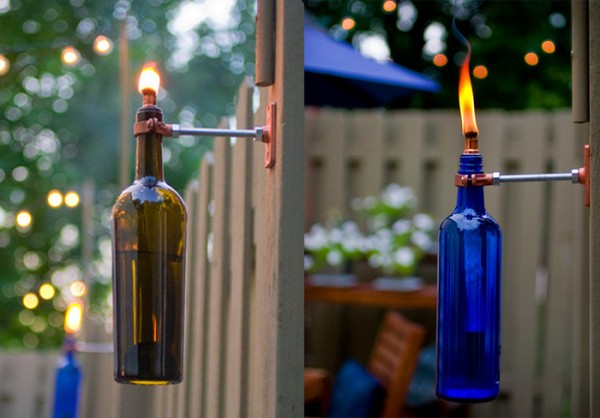

Are you looking out to add something new to the décor of your house? Are budget constraints coming in your way? Wondering what to do with the empty wine bottles after a party? So here is one such project to help you save your money. You can make a beautiful torch from an old wine bottle. This DIY project will not only add beauty to your lawn or balcony but will also brighten it up during festival time. These wine bottle torches are a perfect replacement for your tacky Tiki torches. Let us see how to make this cool and eco-friendly wine bottle torch.
Difficulty Level: Moderate.
It requires basic knowledge about how to make a flame torch.
Time required: 3 – 4 hours
Resources required:
1. An empty Wine Bottle
2. ½ inch of Teflon Tape
3. 1inch of Split Ring Hanger
4. Copper Top Plate Connector
5. 1/2 inch x 3/8 inch Copper Coupling
6. Two Hex Nuts
7. 1/2 inch Copper Cap
8. Two Zinc Plated Wood Screws of 10 x 1 inch
9. 16- 3/8 inch Zinc Plated Threaded Rod
10. Tiki Replacement Wick
11. Torch Fuel
12. Channel locks
13. Hacksaw
14. Funnel
15. Adjustable wrench
16. Power screwdriver
Estimate Cost: $50
Instructions:
Steps for making the Hanger:
Step 1:
Firstly choose a place where you wish to mount the wine bottle torch. Then place the top plate connector on the surface where you will mount it and mark the holes for the screws. This will help you drill the holes in same level.
Step 2:
Now that you have mounted the top plate connector, screw the 3/8 inch -16 rod till it stops.
Step 3:
Now thread both hex nuts into the rod and tighten it at the point where the top connector plate and the rod meet. Leave another hex nut at the front end which can be used to lock the split ring hanger.
Step 4:
Thread on the split ring hanger sufficiently till the rod gets flush with the internal part of the ring. Twist the second hex nut in a counter- clockwise direction to help it snug up alongside the split ring hanger.
Steps for making the Bottle:
Step 1:
Cautiously and firmly drape the lower ½ inch end of the coupling using the Teflon Tape. Keep each wrap clean and even so that it forms a smooth surface. Wrap the tape until it fits very comfortably into the opening of the bottle.
Step 2:
Now insert the wick into this coupling. Allow only 1/4 inch of the wick sticking in the outward direction of the coupling.
Step 3:
Now loosen the screw of the split ring hanger from one side and place the bottle neck in the ring.
Step 4:
Once the bottle is placed perfectly, flip the ring back in to place and tighten it down the hanger properly on both sides. Do not tighten the hanger too much as this would break the glass.
Step 5:
Make use of a funnel to fill the torch oil in the bottle. You can also make use of Tikiâs BiteFighter as its clear and at the same time helps in keeping the mosquitoes at a distance.
Step 6:
Now insert the wick and the coupling in to the top of the bottle and turn it tightly into place. Allow the wick to absorb the oil properly for sometime before you are ready to light it.
Step 7:
When you donât need these torches then simply blow them off and make use of a copper cap to help the wick stay dry when not in use.
Frequently asked questions:
Q. Do you refer any special kind of wick for this bottle torch or any wick will do?
A. Use the Tiki brand wicks which are 3/8 inch in diameter and can be easily replaced. These wicks fit perfectly as well and after absorbing the torch oil they get even tighter.
Quick tips:
If you desire your hardware to have a shiny and unweathered look then give several coats of clear polyurethane before mounting it.
Things to watch out for:
While you are wrapping the Teflon tape to the coupling make sure itâs evenly wrapped and fits the bottles opening perfectly or your coupling would fall inside the bottle.