


Introduction:
Solar ovens are a wise way to harness energy from the sun. Making one does not require a lot of materials, except foil, plastic wrap, and cardboard. Solar designs work best when they directly face the sun. But, manually placing the oven in the direction of sun from time to time can prove to be quite a pain in the neck. This is where a solar sun tracker comes handy. This is easy to make and will ensure the oven always moves with the sun. Listed below are a few easy steps, which will help you build a solar oven with solar tracking.
Difficulty level:
Medium.
Time required:
Time needed will vary from person to person.
What you are going to need:
- Cardboard
- Plastic wrap
- Foil
- Rubber wheel
- Motor
- Nails
- Wood glue
- Double sided tape
- Piano hinges
- Solar panels
- Motor wires
- Screw driver
- Hammer
Things to keep in mind:
There are no special instructions to be kept in mind while making a solar oven. Just be a little careful while using nails and tools like a hammer.
Procedure:
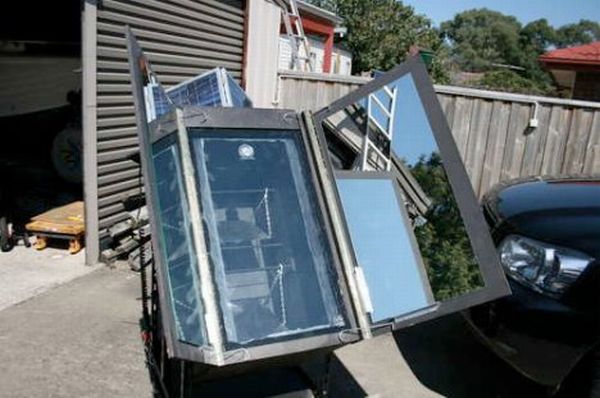
Step 1: Constructing and insulating the box

The walls of the insulating box should have a thickness of 80mm/3 inch that will result in great insulation.
- Craft both the sides separately and pack them with ridged cardboard. You will require wood glue and nails to accomplish most of the structure.
Step 2: Joining sides

Both the sides are smoothened and then painted for an eye-appealing look.
- Join two sides, leaving the other two as is. Later, a glass should be fitted on one of the empty sides; and a door can be fixed on the other to place and remove food items.
Step 3: Working out the mechanics

- Craft an angled frame and make it stick to the base with the help of screws. Use this to hold a steel bar, which will be passed through the oven.
- Club the frame and bar with bearings to make it a rotation point. This will help tilting the oven in the direction of sun.
- Make sure the balance point is a little inclined towards the front for easy usage.
Step 4: Mounting the motor

Now, this is one of the most imported steps. The oven will rotate on its own with the help of a motor.
- Make sure you pick a motor that has a high torque so that it can bear the weight of the oven.
- Alter the ground clearance with the help of an off-center shaft.
Step 5: Installing the motor and the base plate

- Fix a small wheel made of rubber on the shaft of the motor, and fit it at the bottom of the structure.
- Make sure that the motor rotates in order to provide the rubber wheel with optimal pressure. The wheel will move effortlessly when fitted at the base.
Step 6: Making and fitting the rear doors

- Make use of cardboard insulation while making the rear doors.
- Make sure the doors are sliding, can work independently and come fitted in a back frame.
Step 7: The Electronics

- Take two small-sized solar panels and unite them with the help of hinges. Pick ones, which will produce a voltage of 3.3V when in the sun.
- Connect the motor wires with the solar panel wires. Keep in mind that the solar panels should not face each other, which ensures one side will always get enough sunlight. These panels will control the movement of servo, which will in turn pull or push the rod that has been coupled with a toggle switch. The motor is powered because of the toggle switch and this positions the oven in the direction of sun. The motor will turn in response to the movement of the switch. The switch will turn off when both panels receive equal amount of rays.
Step 8: Fitting the panels that will hold the mirrors

- Attach the panels with the help of piano hinges. These will be used to keep the mirrors in place at a sixty degree angle.
- Fix a temperature gauge and self leveling shelves for a better functioning.
Step 9: Adding the mirrors and the glass

- Carefully attach the mirrors and the panels with the help of a double sided tape.
- Now, take the glass front and fit it on the structure.
- Space the mirrors and panels well and make sure it retains enough heat.
Via: Instructables/Treehugger