


If you are sulking over your broken film camera this news will surely cheer you up. With a little effort and a few readily available materials you can actually build a whole new camera while using the lens of your old one. This homemade camera allows you to take incredible pictures with great clarity. You can use any 35mm film for clicking pictures with this camera. It also supports the use of interchangeable lenses which makes it more versatile. However, if you are looking for great shutter speed for clicking pictures in bright light this camera might fall short of your expectations. It works fine for places where the light is not intense.
Difficulty level
Building this camera is not a simple cakewalk. However, it is not rocket science either. All it needs is a little effort and some materials that are easily available. The difficulty level for this task can be rated as medium.
Time required
This project might involve quite a few hours for its completion. Nevertheless, it depends significantly on the skill of an individual.
What are you going to need?
The list of materials for building a homemade box camera includes
1/2″ of Plywood
Wood screws
Black masking tape
Piece of Neoprene
Thin plastic sheet
A broken film SLR camera and its lens
Empty film roll
As for the tools, you need
Table saw
Powdered Miter box
Fine tooth hand saw
Router
Drill and counter sink bit
Hack saw
Coping saw
Razor knife
Scissors
Screw drivers
Dremel tool
Things to keep in mind
Your safety must be the priority while you are using these tools. Make sure you are adept in handling them. Otherwise, they might lead to serious accidents.
Procedure
Step1: Design the Elements:

Use two similar panels for the sides. Each side should have a slot for the entry and exit of the film. Inside these panels you need to create a groove for the shutter curtain. In the rear film panel you should slide a leader film under the recessed piece of plastic, as shown in the picture. As for the shutter curtain, it should be made of thin plastic similar to that which is used on the film plane. Attach a thin piece of wood to this curtain with glue. This will keep the shutter from moving out of the camera and allow right exposure to your film.
Step 2: Design Elements

Attach a neoprene seal to the top panel. Its thickness should be about 1/4 inch. Cut it down the length while keeping its ends intact. This will help you slip the seal over it. You need to make this same cut in the top panel as well to allow the shutter curtain slip through. This will help you hold the top and use the shutter curtain. The bottom panel of this camera should have a shutter curtain groove and the scope to attach your tripod mount.
Step 3: Assembly

Now it is time to assemble your camera. You should begin by attaching the side panels to the rear panel. While attaching the top panel you will find that the piece of wood attached to the shutter actually helps you keep the shutter in its place. Once the front of the camera is installed you can make out how the opening for the lens is aligned with the 35mm frame opening on the rear panel.
Step 4: Final Touches

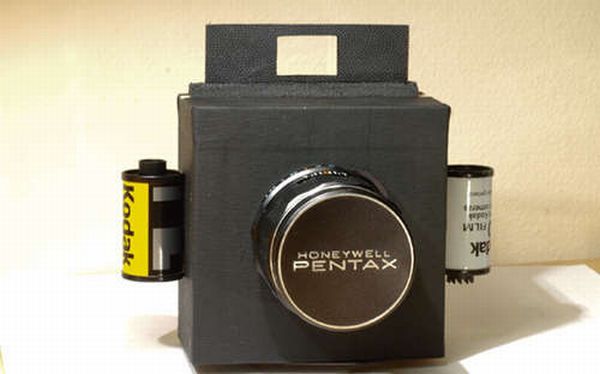
Use a black masking tape to prevent any interference of light. Pay special attention to the neoprene seal. Attach an empty film to one side of your camera and tape another roll to the other side. This should be followed by wrapping up your camera with a black masking tape. Once it is wrapped your camera is ready.
Step 5: Sample Photo

This is the sample picture taken from this incredible homemade 35mm Box Camera