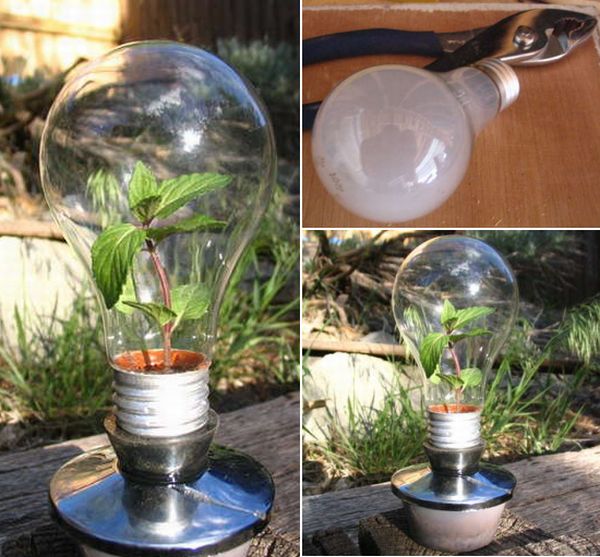
The environment is getting deteriorated with each passing day. Humans have made their surroundings a dump yard and don’t even think once before disposing things. With a little extra effort, even trash can be given a new lease of life. Every household and office area needs light bulbs for illumination. Instead of throwing them, when they burn out, why not convert this illuminating device into a flower pot/greenhouse? Making one will require simple and everyday materials like epoxy and glue. Clear bulbs are preferred over others, as they will make the plant more visible. What you will get in the end is, a cute light bulb greenhouse of your own.
Difficulty Level:
Fashioning greenhouse using a light bulb ranks ‘Moderate’ on the level of difficulty.
Time required:
Dedicate an hour out of your precious life and become an environment lover.
Resources required:
• An old lightbulb
• Epoxy
• -7/16″ socket
• Some rubber part
• Thing that goes between shower head and tiles
• Small plastic cup
• Soil
• Pliers
• File
• Compressor
• Drill, drill bit
Things to keep in mind:
Light bulbs are quite delicate and need to be handled carefully. While making a greenhouse, be extra cautious not to break one else you will have to discard it. Broken light bulbs won’t solve any purpose, and you will have to swap it with a fresh one and start from scratch. Breaking the bulb could also lead to injury, so be extremely careful.
Procedure:
To convert a humble light bulb into a greenhouse, take pliers and pull out its contact from the base. The contact will be held together by glass, which needs to be broken with the help of a file. Next, smoothen out the boundaries after rupturing the glass from the inside. You will see that some white colored powder will get collected in the light bulb. Before moving on to the next step, make sure it is cleaned with a piece of cloth or water.
Now, take the socket and using a drill (press) to broaden its bottom opening. To make sure the socket fits perfectly in the light bulb, enlarge the hole underneath the bulb as well. Further, the socket and rubber piece should be fastened together with epoxy. After this step, you need to leave the arrangement untouched for a minimum twenty minutes and make sure it dry before proceeding further.
Take the arrangement and secure it with epoxy to the shower part, and let it dry for another twenty minutes. Lastly, add a plant or seed of your choice and soil in the cup. Place the base over it followed by the light bulb. Position it anywhere you feel like, and see this dainty greenhouse highlight that area with its aura.


